
Quick Answer
To install your robot lawnmower, first position the charging station on a flat edge of your lawn. Next, lay the boundary wire around the mowing area, ensuring it returns to the charging station to create a complete loop. Once connected and powered, the charging station LED should display a solid light, confirming the boundary wire is correctly installed.
Before You Begin
Before starting the installation, ensure you have:
- Your robot lawnmower.
- Charging station.
- Boundary wire.
- Boundary wire fixing pegs.
- Charging station fixing pegs.
- A hammer or rubber mallet.
- Wire strippers.
- Access to a mains power socket.
Before laying the boundary wire:
- Remove any obstacles or debris from the installation area.
- Plan the mowing area and charging station location.
- Ensure the total boundary wire length does not exceed 300 metres.
Tip: Watching the installation video before you begin can make the installation process much easier.
Planning & Installing Video
The first stage of using your robot mower is setting up the charging station and laying out the boundary:
Steps
1. Install the Charging Station
Choose a suitable location for the charging station.
The charging station should be:
- Positioned on the edge of your lawn.
- Installed on flat, level ground.
- Free from obstacles directly in front of the station.
- Close enough to reach a mains power socket.
Once the boundary wire has been positioned:
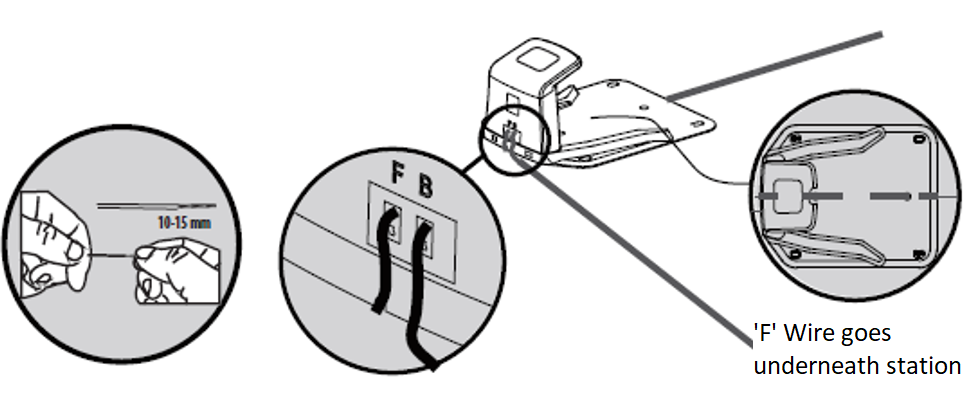
- Place the boundary wire underneath the charging station.
- Secure the charging station using the four fixing pegs provided.
- Take care not to pinch, damage or kink the boundary wire.
Important: An incorrectly positioned charging station may prevent the mower from docking correctly.
NOTE: mower will not dock correctly if the station is incorrectly set.


2. Lay the Boundary Wire
The boundary wire creates the mowing area for your robot lawnmower.
To install the wire:
- Starting at the charging station, lay the wire around the edge of your lawn.
- Secure the wire using the supplied pegs, tapping them gently into the ground with a hammer or rubber mallet.
- Strip approximately 10–15 mm of insulation from both wire ends.
- Twist the exposed wire strands before inserting them into the charging station terminals.
Connect the wire as follows:
- F = Outgoing boundary wire (runs underneath the charging station).
- B = Returning boundary wire (returns to the charging station).
When laying the wire, ensure that:
- There is at least 2 metres of straight boundary wire directly in front of the charging station.
- No boundary wire corners are tighter than 120°.
- The total boundary wire length does not exceed 300 metres.
- Any excess wire is laid flat underneath or behind the charging station, outside the mowing area.
- Do not coil or roll up surplus wire, as this can interfere with the boundary signal.


3. Power the Charging Station
- Plug the charging station into the mains power supply.
- Check the LED indicator on the rear of the charging station.
The LED status indicates:
- Solid LED – The charging station and boundary wire are operating correctly.
- Flashing LED – The boundary wire is broken, disconnected or incorrectly installed and should be inspected before using the mower.
Frequently Asked Questions
Where should I place the charging station?
Install the charging station on flat, level ground around the edge of your lawn with a clear approach for the mower. Ensure there is at least 2 metres of straight boundary wire extending from the front of the charging station.
Which way does the boundary wire connect?
The outgoing boundary wire connects to terminal F, while the returning boundary wire connects to terminal B.
How much boundary wire can I install?
The total boundary wire length must not exceed 300 metres.
Can I coil any spare boundary wire?
No. Excess wire should be laid flat underneath or behind the charging station, outside the boundary. Never coil or roll up spare wire, as this can affect the boundary signal.
What does a flashing LED on the charging station mean?
A flashing LED indicates there is a problem with the boundary wire, such as a break, poor connection or incorrect installation. Inspect the entire boundary wire and all connections before operating the mower.
Why won't my robot return to the charging station?
This is commonly caused by:
- The charging station not being level.
- Less than 2 metres of straight boundary wire leaving the charging station.
- Incorrect boundary wire connections.
- A damaged or broken boundary wire.
- Tight corners or incorrect boundary wire layout.
Correcting these issues should allow the mower to locate and dock with the charging station successfully.