
Quick Answer
If your self-propel system is not engaging properly, the most common cause is incorrect cable tension. The cable should have a small amount of free play (typically 5–10 mm). Too much slack will prevent the drive system from engaging correctly.
⚠️ Safety Notice
Before carrying out any checks or adjustments:
- Ensure the mower is switched off and cannot start accidentally
- Disconnect the spark plug cap where possible
- Keep hands away from moving parts
- Work on a flat, stable surface
Do not operate the mower with damaged cables or exposed drive components.
Visual Guidance
Please refer to the accompanying video for a visual demonstration of the cable adjustment procedure.
Understanding the Self-Propel System
The self-propel system works through several connected components:
- Self-propel drive cable
- Drive belt
- Gearbox and drive mechanism
If any of these components are worn, damaged, or incorrectly adjusted, the self-propel function may fail.
This guide focuses specifically on cable tension.
Checking the Self-Propel Cable
The self-propel cable runs from the handle lever down to the gearbox on the mower deck.
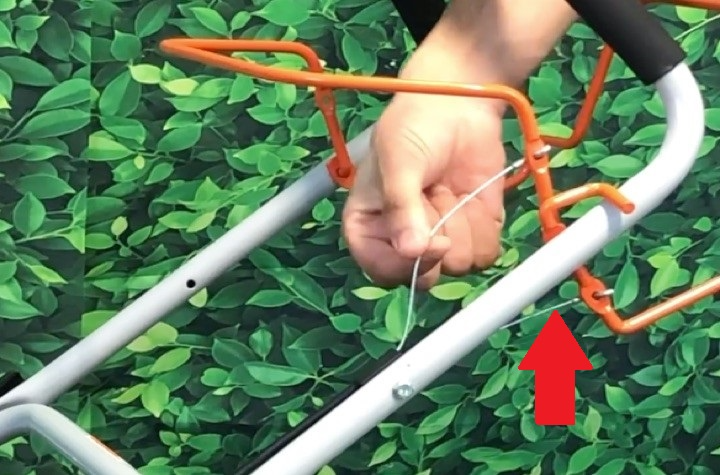
Step 1 – Inspect the Cable
- Locate the self-propel cable along the handle
- Check how much free movement (slack) is present
- Operate the self-propel lever and observe cable movement
Expected Tension
- 5–10 mm of free play = Normal
- More than 10 mm of free play = Likely too loose
- Very tight / no movement = Over-tensioned
If the cable is outside this range, adjustment is required.
Adjusting the Cable Tension
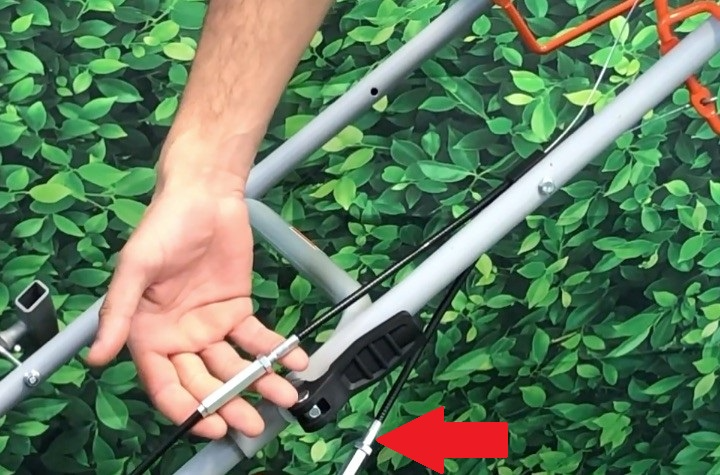
Step 1 – Locate the Barrel Adjuster
- Find the silver barrel adjuster along the cable
- This is usually positioned midway down the cable route
Step 2 – Loosen the Locking Nut
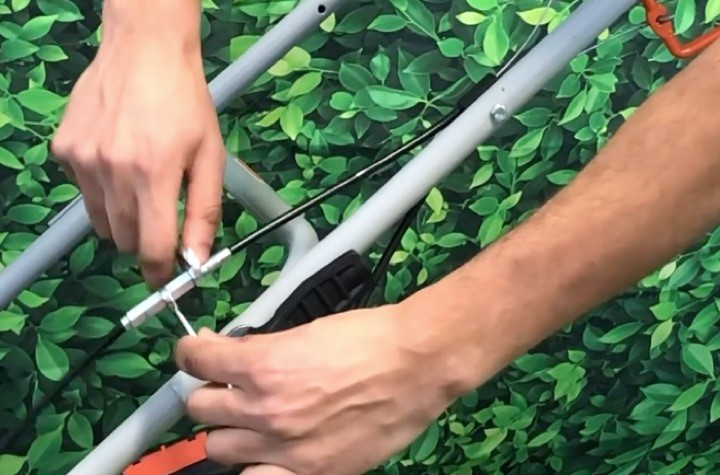
- Use the correct spanner (typically 8–12 mm depending on model)
- Loosen the locking nut at the top of the adjuster
Step 3 – Adjust the Cable
- Turn the barrel adjuster to reduce slack
- Adjust gradually in small increments
- Check lever movement as you adjust
Aim for 5–10 mm of free play in the lever.
Step 4 – Secure the Adjustment
- Tighten the locking nut against the barrel adjuster
- Ensure the adjustment does not move when tightened
Step 5 – Test the Self-Propel System
- Operate the self-propel lever
- Check that the mower drives smoothly
- Ensure engagement is immediate and consistent
Additional Causes of Self-Propel Failure
If correct cable tension does not restore operation, check the following:
Drive Belt Issues
- Loose belt
- Worn belt
- Broken belt
- Belt slipped off pulley
Gearbox Problems
- Worn internal gears
- Seized drive mechanism
- Damaged drive pulley
Cable Damage
Inspect the cable for:
- Fraying
- Kinks or bends
- Rust or corrosion
- Broken inner cable
If any damage is found, the cable must be replaced.
Frequently Asked Questions
What is the correct self-propel cable tension?
Typically, the correct setting is 5–10 mm of free play at the control lever.
Why is my mower self-propel not engaging?
Common causes include:
- Loose cable tension
- Worn or broken drive belt
- Damaged gearbox components
- Stretched or frayed cable
Can I overtighten the self-propel cable?
Yes. Over-tightening can cause:
- Constant drive engagement
- Premature belt wear
- Increased strain on gearbox components
Do I need tools to adjust the cable?
Most models require a spanner (usually 8–12 mm) to loosen and tighten the locking nut on the barrel adjuster.